What Is a Webhook, and How Does It Work?
Webhooks are automated messages sent from one application to another whenever a specific event occurs. In the context of HubSpot, a webhook can be triggered by a workflow event, such as a form submission or updates to a contact’s properties. The webhook sends data to your PHP script, where you can process, validate, or format it before sending back a response.
For example, if a user enters their email and phone number in a HubSpot form, the workflow can send this data to your PHP webhook for validation and formatting.
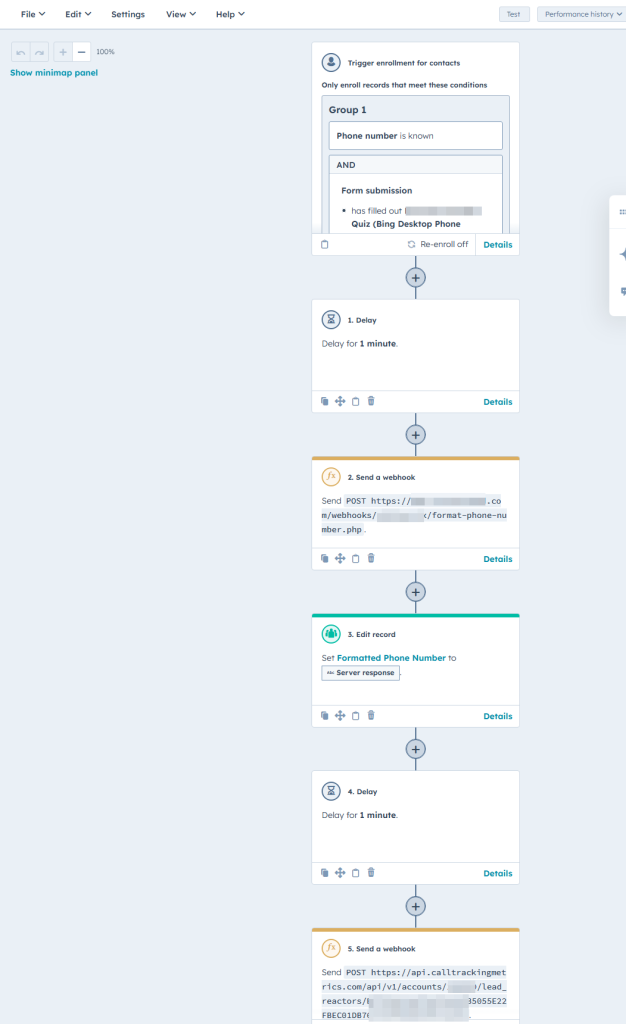
How Do You Configure a HubSpot Workflow to Use a Webhook?
To configure a HubSpot workflow with a webhook:
- Create a Custom Property: In HubSpot, navigate to Settings > Properties and create a new property called “Formatted Phone Number.” This property will store the formatted phone number returned by the webhook.
- Create a Workflow: In your HubSpot account, go to Automation > Workflows and create a new workflow.
- Trigger the Workflow: Set a trigger, such as a form submission or contact property update.
- Add an Action: Choose “Trigger a webhook” as one of the workflow actions.
- Provide the Webhook URL: Enter the URL where your PHP script is hosted.
Once this is set up, HubSpot will send data to your webhook whenever the workflow is triggered.
How Do You Set Up a PHP Webhook for Email and Phone Number Validation?
Start by creating a PHP script that will act as your webhook endpoint. Use the following code as a base:
header("Content-Type: application/json");
$input = file_get_contents('php://input');
$data = json_decode($input, true);

// Check if 'email' and 'phone' are provided
if (!isset($data['email']) || !isset($data['phone'])) {
    http_response_code(400);
    echo json_encode(['error' => 'Email and phone are required']);
    exit;
}

$emailValid = validateEmail($data['email']);
$formattedPhone = formatUSPhoneNumber($data['phone']);

http_response_code(200);
echo json_encode([
    'email' => $data['email'],
    'email_valid' => $emailValid,
    'formatted_phone' => $formattedPhone
]);
exit;

function validateEmail($email) {
    return filter_var($email, FILTER_VALIDATE_EMAIL) !== false;
}

function formatUSPhoneNumber($phoneNumber) {
    $cleanedNumber = preg_replace('/\D/', '', $phoneNumber);
    if (strlen($cleanedNumber) == 10) {
        return '+1' . $cleanedNumber;
    } elseif (strlen($cleanedNumber) == 11 && $cleanedNumber[0] == '1') {
        return '+' . $cleanedNumber;
    }
    return $phoneNumber;
}
This script validates the email and formats the phone number into the standard US format. The formatted phone number will later be stored in HubSpot.
How Do You Store the Server Response in a HubSpot Property?
To store the server response, you need to update the “Formatted Phone Number” property in HubSpot. Here’s how:
- Map the Webhook Response to HubSpot: When setting up the webhook action in the workflow, map the webhook’s response fields to the corresponding HubSpot properties. For example, map the
formatted_phonefield to the “Formatted Phone Number” property. - Save the Response: Once the webhook processes the data and sends the formatted phone number back to HubSpot, it will automatically populate the “Formatted Phone Number” property.
This setup ensures that the formatted phone number is stored and can be used for further automation tasks or integrations.
How Can You Use the Formatted Phone Number for Further Tasks?
After storing the formatted phone number in HubSpot, you can use it for:
- API Integrations: Pass the formatted phone number to another system via an API call.
- Custom Workflows: Use the formatted phone number in subsequent workflow steps, such as sending SMS notifications or personalized emails.
- Data Analytics: Leverage the formatted data for reporting and analytics.
By ensuring that your data is clean and formatted, you can maintain high-quality records and improve the efficiency of your automation processes.
How Do You Test the Webhook?
Testing ensures the webhook behaves as expected. Here’s how to do it:
- Local Testing: Use tools like Postman to simulate HubSpot’s payload. Set the request method to POST, provide the JSON payload, and send it to your local server.
- Remote Testing: Deploy the script to a live server and configure the HubSpot workflow to use its URL. Trigger the workflow to send test data.
- Debugging: Log incoming data and errors using
error_log()or a logging library.
For example, test with this payload:
{
  "email": "test@example.com",
  "phone": "+18888888888"
}
What Happens If the Payload Is Missing Required Data?
If the email or phone field is missing, the script responds with an error message and a 400 Bad Request status code:
if (!isset($data['email']) || !isset($data['phone'])) {
    http_response_code(400);
    echo json_encode(['error' => 'Email and phone are required']);
    exit;
}
This ensures that invalid requests are gracefully handled.
How Do You Secure the Webhook?
To secure the webhook:
- Validate Incoming Data: Only accept requests with valid email and phone numbers.
- Use HTTPS: Ensure your webhook URL uses HTTPS to encrypt data in transit.
- Verify Source: Use HubSpot’s request signature to verify the authenticity of incoming requests.
How Do You Extend This Setup for Additional Use Cases?
You can extend this setup to handle more complex tasks, such as:
- Additional Data Validation: Validate other fields like zip codes, names, or addresses.
- Custom Formatting: Apply different formatting rules for international phone numbers.
- Error Handling: Log errors and notify administrators of invalid data submissions.
How Do You Visualize and Debug Workflow Data?
To make it easier to debug and monitor, you can log incoming requests in a file:
file_put_contents('webhook_log.txt', print_r($data, true), FILE_APPEND);
This logs each incoming payload to webhook_log.txt for review.


